LED Blink with STM32Cube Framework
Let's blink an LED on the Blackpill STM32 board using the STM32Cube framework.
STM32Cube Framework
With STM32Cube framework, you can access the full power of the STM32 microcontroller. The STM32Cube framework provides low-level access to the STM32 hardware, allowing you to write code that is more efficient and optimized for performance.
Prerequisites
In this tutorial, the following hardware is used:
Blackpill STM32 board
MCU: STM32F411CEU6
Board: WeAct Black Pill V2.0
Schematic
You can purchase a cheap clone Blackpill STM32 board under $4. You can use other STM32 boards, but you need to modify platformio.ini file and the LED pin number.
ST-LINK V2 Programmer
You need this to upload the firmware to the board. You can purchase a cheap clone ST-LINK V2 under $5.
Installation
VScode with PlatformIO
You can install PlatformIO from the VSCode extension marketplace.
STM32CubeProgrammer
You need this to flash the firmware to the board.
STM32CubeMX
This tool allows you to configure the STM32 microcontroller and generate the initialization code for your project.
Clone the repository
git clone --branch blackpill-led-blink-stm32cube https://github.com/yuichiroaoki/stm32-tutorial.git
cd stm32-tutorial
Quickstart
-
Connect the Blackpill STM32 board to the ST-LINK V2 programmer.
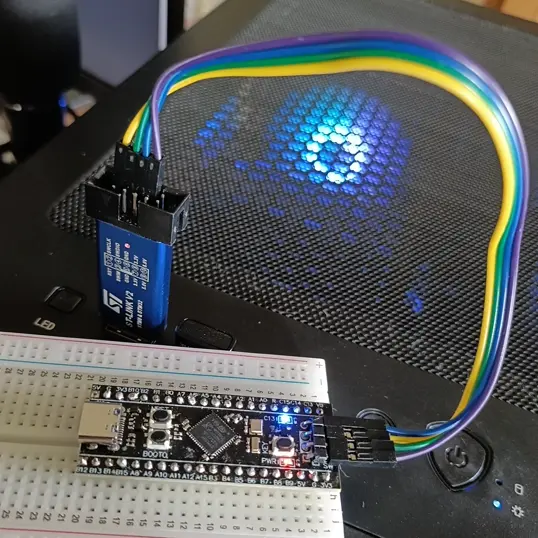
Connect the ST-LINK V2 programmer to the Blackpill STM32 board as shown in the image above. -
Connect the ST-LINK V2 programmer to your computer.
-
Open the project folder in VSCode.
-
Click on the PlatformIO tab on the left sidebar and click on the
Uploadbutton to upload the firmware to the board.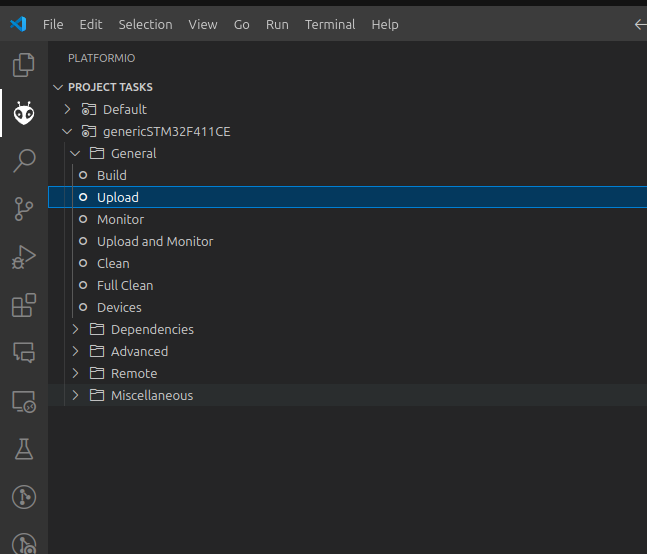
Now you should see the LED on the Blackpill STM32 board blinking.
Initial code generation with STM32CubeMX
Using STM32CubeMX, you can configure the STM32 microcontroller and generate the initialization code for your project such as GPIO configuration, clock configuration, etc.
-
Open STM32CubeMX and create a new project.
-
Select the STM32F411CE microcontroller.
-
Click
SYSin the sidebar and selectSerial Wirein the Debug drop-down menu.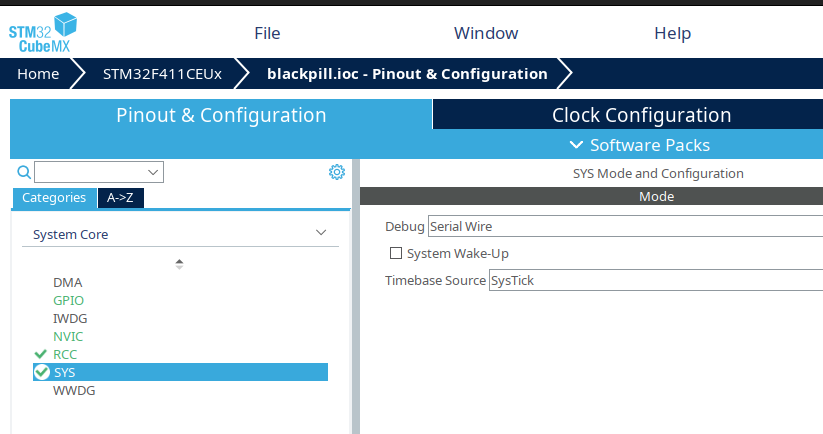 info
infoThis is important because without this setting, you won't be able to upload the firmware to the board.
-
Click the LED pin in the Pinout & Configuration tab and select
GPIO_Outputin the Mode drop-down menu.For the Blackpill STM32 board, the LED pin is
PC13. You should change the pin according to your board.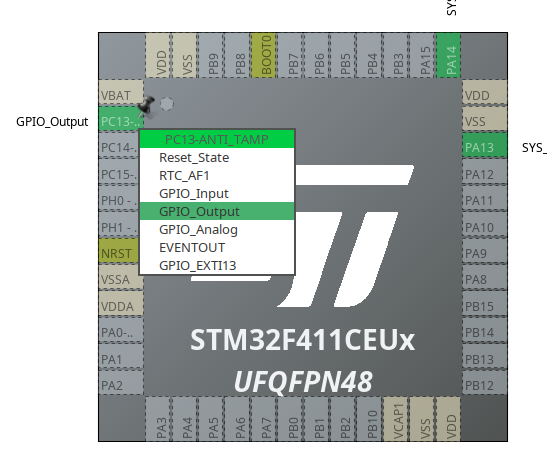
-
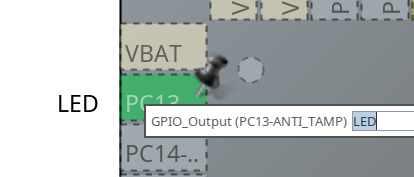
Right-click on the LED pin and select
Enter User Labeland name the pinLED.tipThis is useful because you can refer to the pin by name in your code.
-
Click
RCCin the sidebar and selectCrystal/Ceramic Resonatorin the High Speed Clock (HSE) drop-down menu.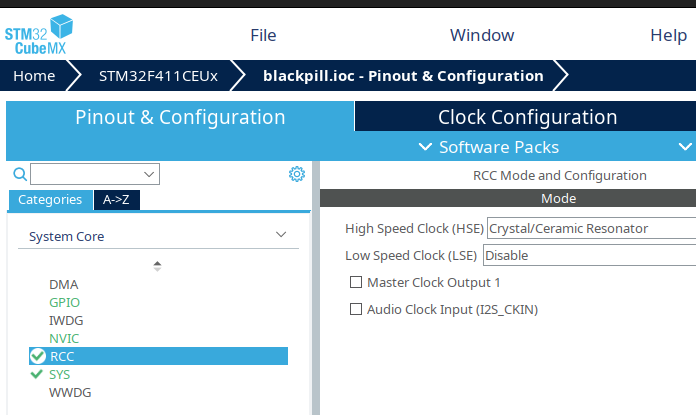
-
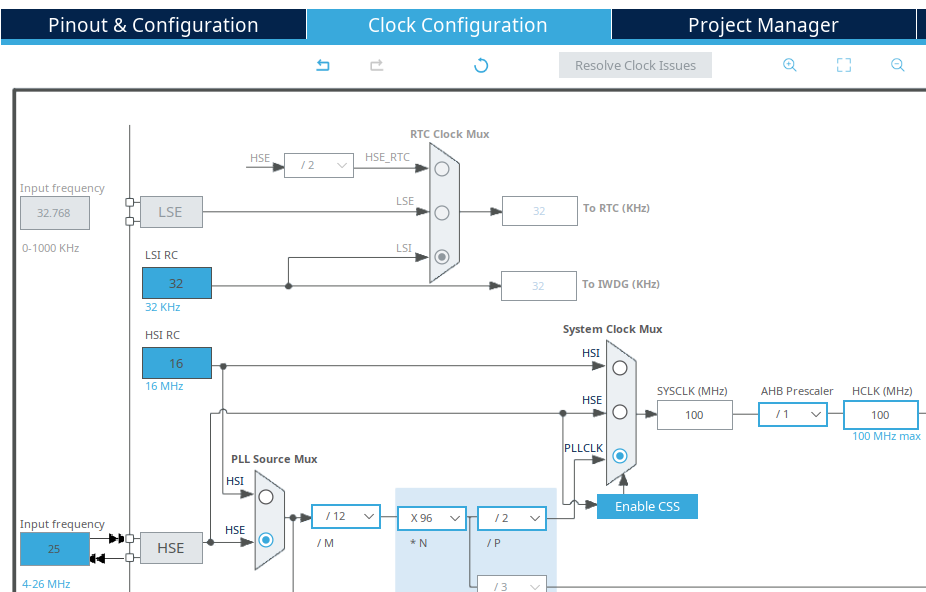
Click
Clock Configurationtab and configure the clock settings as follows:- Input 25MHz in the HSE Value field
- Select
HSEinPLL Source MuxandPLLCLKinSystem Clock Mux - Input 100MHz in the
HCLKfield and pressEnterto calculate the values for the other fields.
noteThe Blackpill STM32 board has a 25MHz crystal oscillator, so you should input 25MHz in the HSE Value field.
-
Click
Project Managertab, setToolchain Folder Locationto where you want to save the project, and generate the code.
Now you have the initialization code for your project.
Use the generated code in PlatformIO
-
Copy the generated code to the
srcfolder in the PlatformIO project folder.If you use Linux or macOS, you can use the following command to copy the code:
cp -r <STM32CubeMX project folder>/Core/**/* <PlatformIO project folder>/src/ -
Add the following two lines to the
main.cfile at the end of thewhileloop to blink the LED:main.c/* USER CODE BEGIN 3 */
HAL_GPIO_TogglePin(LED_GPIO_Port, LED_Pin);
HAL_Delay(1000);noteIf you named the LED pin
LEDin STM32CubeMX, theLED_GPIO_PortandLED_Pinwill be defined in thegpio.hfile, so you can use them in your code. -
Add the the following line to
platformio.inifile to use the configuration header file generated by STM32CubeMX:platformio.iniboard_build.stm32cube.custom_config_header = yes -
Click on the PlatformIO tab on the left sidebar and click on the
Uploadbutton to upload the firmware to the board.
Now you should see the LED on the Blackpill STM32 board blinking.