LED Blink with Arduino Framework
Let's blink an LED on the Blackpill STM32 board using the Arduino framework.
Arduino Framework
This tutorial uses the Arduino framework to blink an LED on the STM32 board. The Arduino framework is a popular choice for beginners because it provides a simple and easy-to-use API. The Arduino framework abstracts the low-level details of the STM32 hardware, making it easier to write code for the STM32 microcontroller.
Prerequisites
In this tutorial, the following hardware is used:
Blackpill STM32 board
MCU: STM32F411CEU6
Board: WeAct Black Pill V2.0
Schematic
You can purchase a cheap clone Blackpill STM32 board under $4. You can use other STM32 boards, but you need to modify platformio.ini file and the LED pin number.
ST-LINK V2 Programmer
You need this to upload the firmware to the board. You can purchase a cheap clone ST-LINK V2 under $5.
Installation
VScode with PlatformIO
You can install PlatformIO from the VSCode extension marketplace.
STM32CubeProgrammer
You need this to flash the firmware to the board.
Clone the repository
git clone --branch blackpill-led-blink-arduino https://github.com/yuichiroaoki/stm32-tutorial.git
cd stm32-tutorial
Quickstart
-
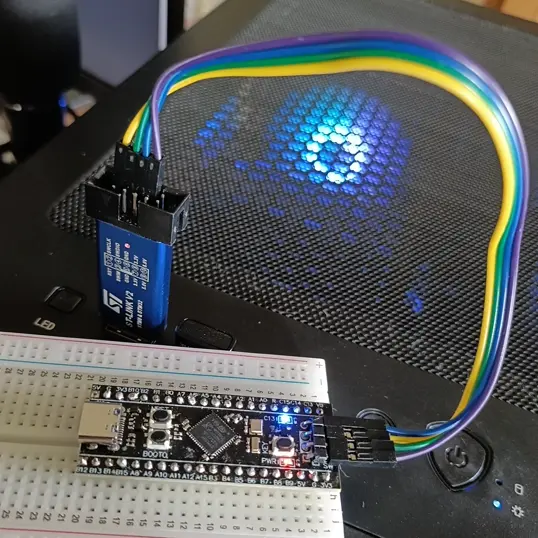
Connect the Blackpill STM32 board to the ST-LINK V2 programmer.

Connect the ST-LINK V2 programmer to the Blackpill STM32 board as shown in the image above. -
Connect the ST-LINK V2 programmer to your computer.
-
Open the project folder in VSCode.
-
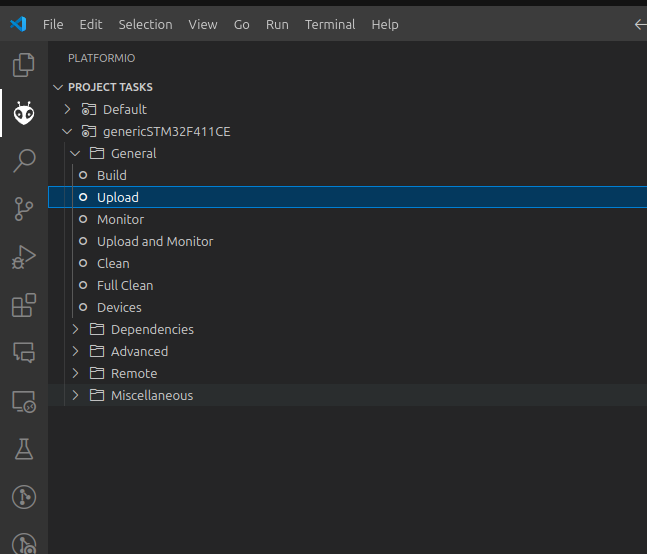
Click on the PlatformIO tab on the left sidebar and click on the
Uploadbutton to upload the firmware to the board.
Now you should see the LED on the Blackpill STM32 board blinking.
Since the blue LED is connected to 3.3V through a resistor and then to PC13, you need to set PC13 to LOW to turn the LED on and HIGH to turn it off.
Code
Here is the full code to blink an LED on the STM32 board:
#include <Arduino.h>
#include <WSerial.h>

#define LED_PIN PC13

void setup() {
  Serial.begin(115200);

  pinMode(LED_PIN, OUTPUT);
  delay(3000);
  Serial.println("Start!");
}

void loop() {
  Serial.println("LED off!");
  digitalWrite(LED_PIN, HIGH);
  delay(1000);
  Serial.println("LED on!");
  digitalWrite(LED_PIN, LOW);
  delay(1000);
}
For the Blackpill STM32 board, the LED pin is PC13. You should change the pin according to your board.
USB Serial Communication
- Connect the Blackpill STM32 board to your computer via USB.
- Press
Ctrl+Shift+Pand selectPlatformIO: Monitorto open the serial monitor.
You should see the following message:
Start
LED off!
LED on!
LED off!
In order to communicate with the board via USB, you add the following lines to the platformio.ini file:
[env:genericSTM32F411CE]
platform = ststm32
board = genericSTM32F411CE
lib_archive = false
framework = arduino
upload_protocol = stlink
monitor_speed = 115200
build_flags =
  -D PIO_FRAMEWORK_ARDUINO_ENABLE_CDC
  -D PIO_FRAMEWORK_ARDUINO_SERIAL_WITHOUT_GENERIC